Advance Life Support : Airway Management, Ventilation
The Advanced Life Support (ALS) course aims to coach vital resuscitation skills to medical personnel especially those working in acute and critical care areas.
This course extends beyond the basic ABCs of resuscitation and intends to equip participants with the skills and knowledge to perform as a vital member of the resuscitation team.
Strong Basic Life Support (BLS) skills are the foundation of ALS therefore participants are expected to have passed the BLS Course before enrolling for this course
Isi Kandungan
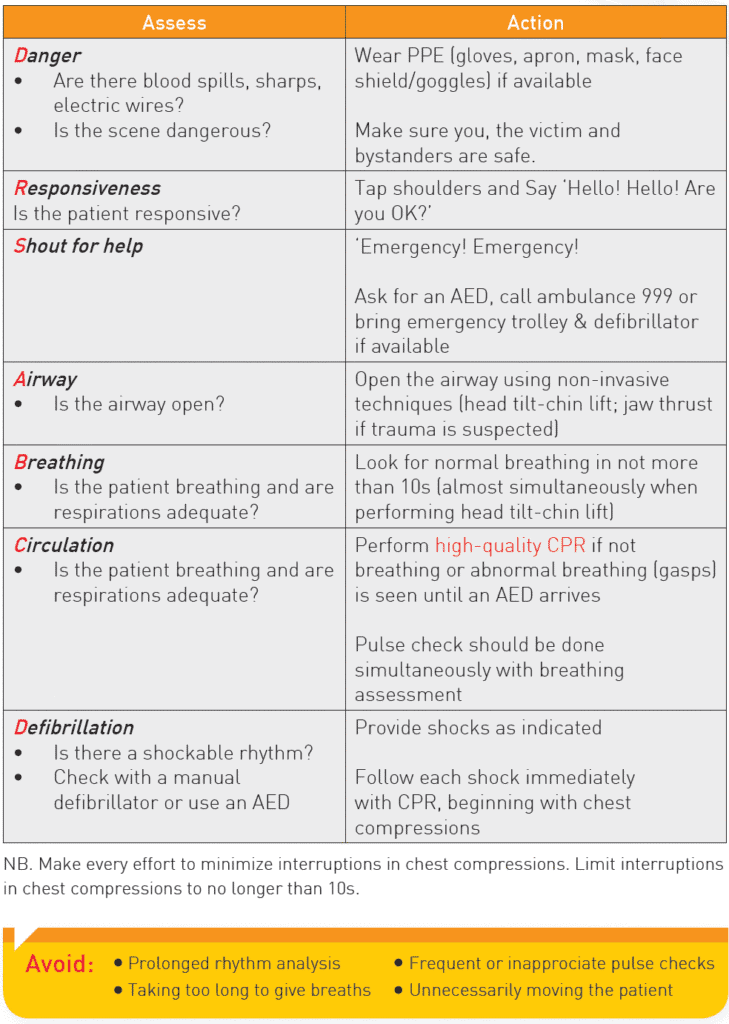
BLS Primary Survey
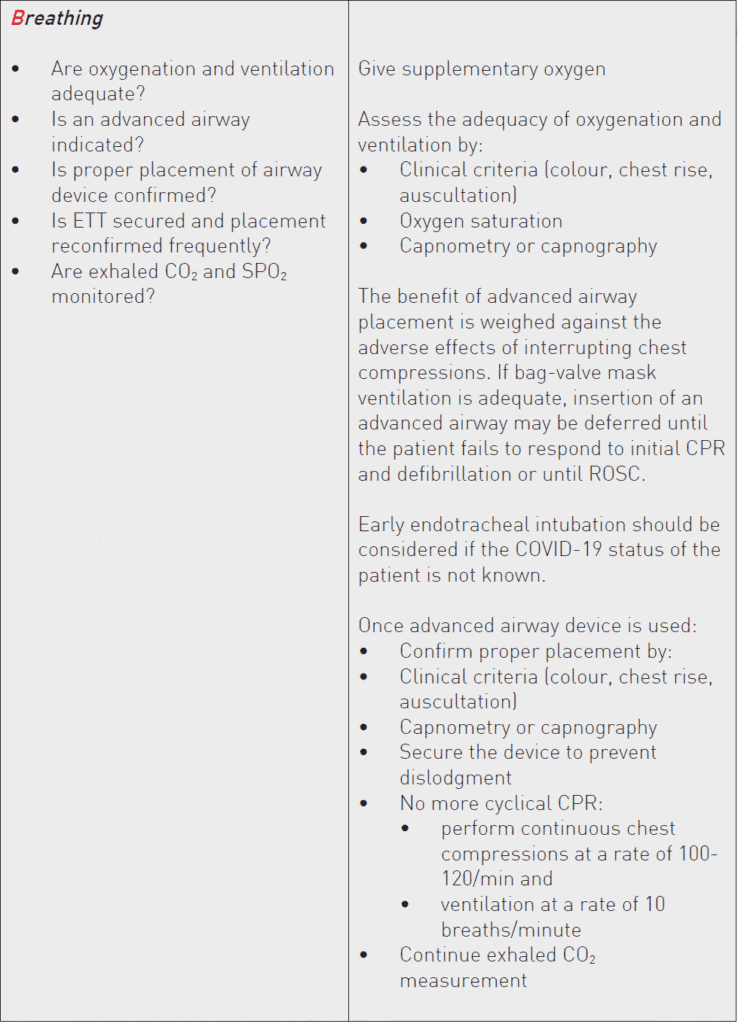
ALS Secondary Survey
- The ALS Secondary Survey is conducted after the BLS Primary Survey when more advanced management techniques are needed.
- Advanced airway interventions may include the laryngeal mask airway (LMA), or endotracheal tube (ETT) insertion.
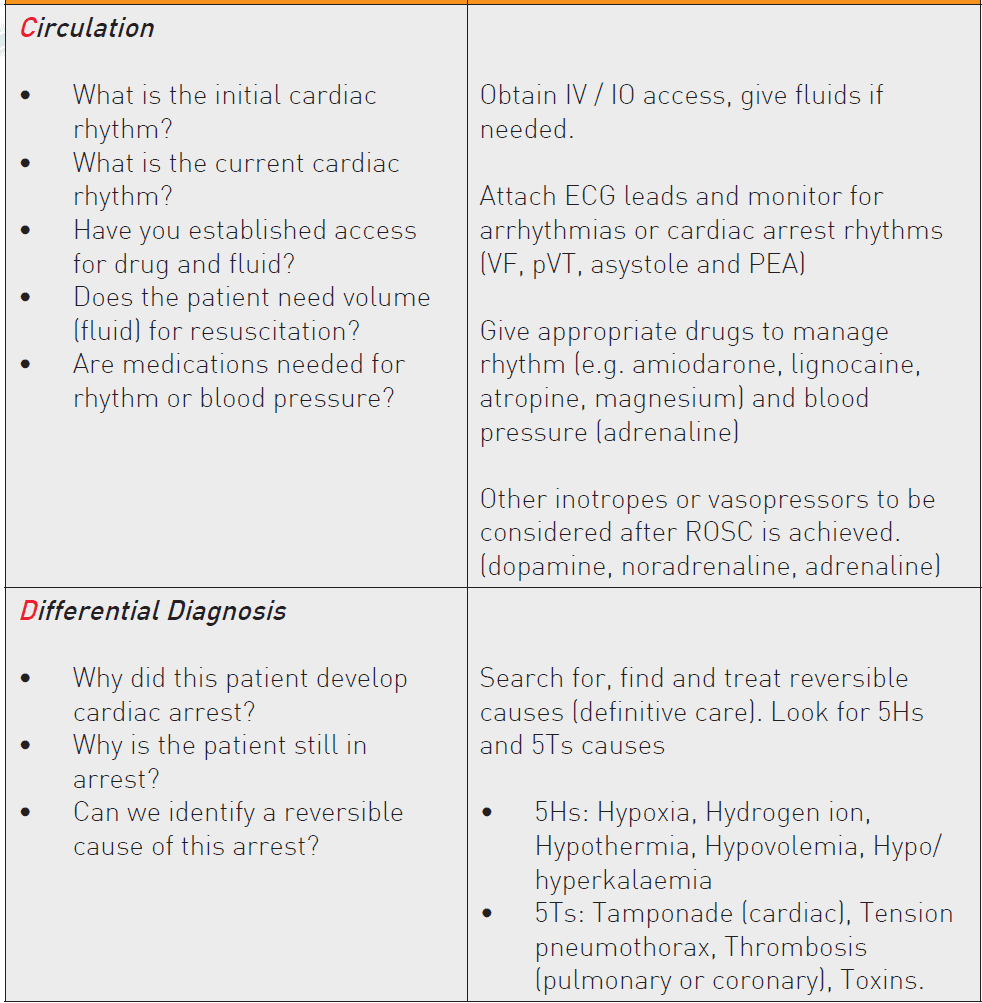
- Advanced circulatory interventions may include drugs to control heart rhythm and support blood pressure.
- An important component of this survey is the differential diagnosis, where identification and treatment of the underlying causes may be critical to patient outcome. In the ALS Secondary Survey, you continue to assess and perform an action as appropriate until transfer to the next level of care. Many times, assessments and actions in ALS will be performed simultaneously by team members

Airway Management & Ventilation
Maintaining oxygenation during CPR and peri-arrest period is important. As an
integral part of oxygenation, a patent airway is paramount to facilitate adequate
ventilation to improve oxygenation and sufficient elimination of carbon dioxide.
Airway management during resuscitation depends on patient factors, the phase of
resuscitation (during CPR or after ROSC) and the skill of the rescuers. A variety of
modalities of airway management e.g. bag valve mask (BVM), supraglottic airway
devices (SGAs) and endotracheal tube (ETT) are considered during resuscitation
as a part of stepwise approach to airway management. Ultimately endotracheal
intubation is needed for post resuscitation care if the victim remains unconscious
after ROSC.
Oxygen Supplement
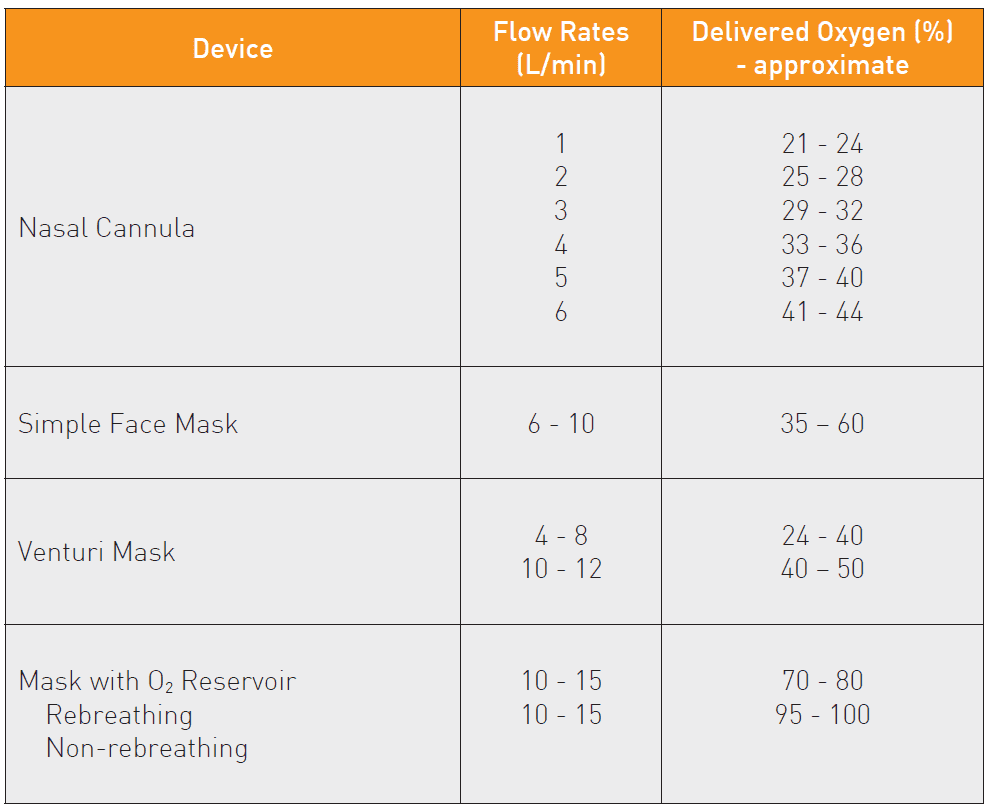
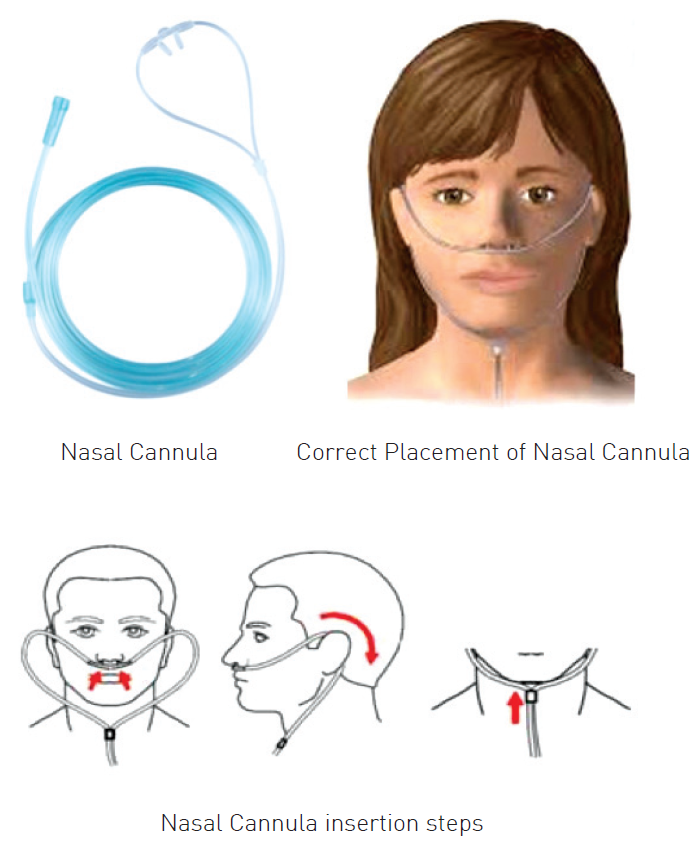
Nasal Cannula/Prong
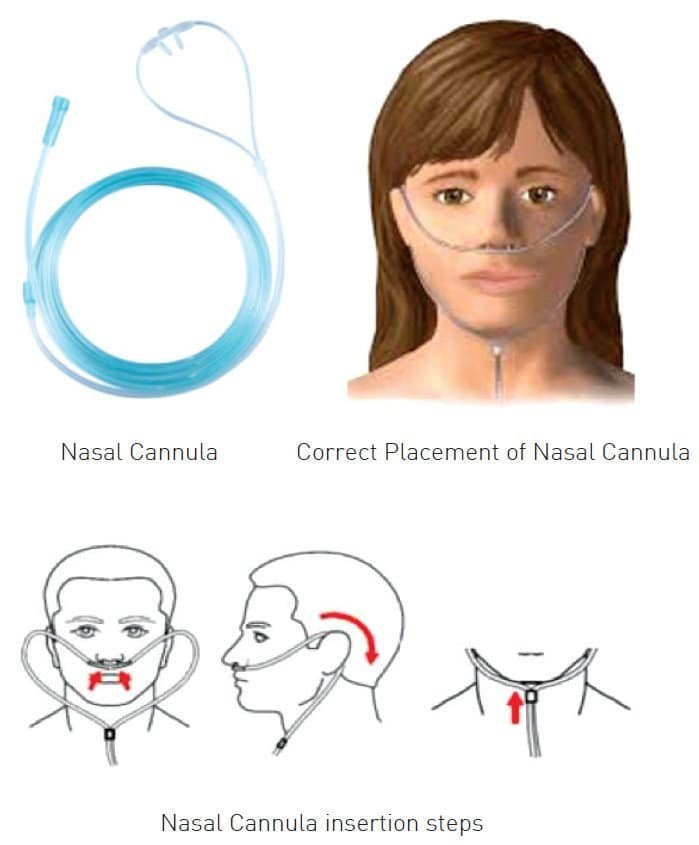
- Consists of 2 prongs
- Every 1L/minute increase in O2 flow rate increase in FiO2 by 4%.
- Usually 1-6L/minute O2 given
- Do not use more than 6L/minute O2 as this does not increase oxygenation much, yet dries up nasal passages and is uncomfortable to patient
- O2 concentration depends on:
- O2 supply flow rate
- Pattern of ventilation
- Patient inspiratory flow rate
Simple Face Mask

Made from silicone rubber or transparent plastic
- Various size, from pediatric to big adult
- Fits loosely on the face, which allows room air to be inhaled, if needed
- O2 concentration depends on:
— O2 supply flow rate
— Patient inspiratory flow rate
— Pattern of ventilation
— Tight fit of the mask - Supplies 35% to 60% oxygen with flow rates of 6 to 10L/ minute
- Does not supply oxygen > 60%
Venturi Mask

- Based on Bernoulli’s principle
— O2 passes through a narrowed orifice and this creates a high velocity stream of gas. This high velocity jet stream generates a shearing force known as viscous drag that pulls room air into the mask through the entrainment ports on the mask.
- Gives desired concentration of oxygen to patient (24% to 60%)
- Ideally used for patient with Chronic Obstructive Pulmonary Disease (COPD)
Mask with O2 Reservoir
The addition of a reservoir bag to a standard face mask increases the
capacity of the O2 reservoir by 600 to 1000 ml. If the reservoir bag is kept
inflated, the patient will inhale only the gas contained in the bag.
- There are two types of mask-reservoir bag devices:
Non-invasive Airway Devices
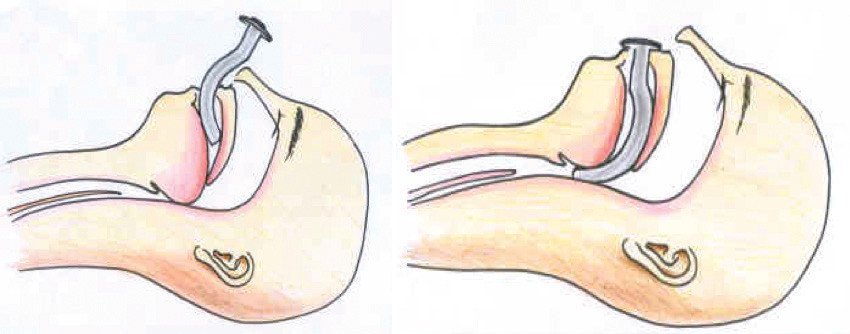
1. Oropharyngeal Airway
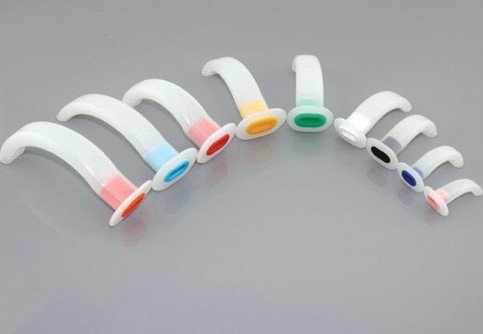
A semicircular tube to hold the tongue away from the posterior wall of the
pharynx
- Used in comatose patients or patients with loss of airway reflex
- May cause laryngospasm in semi-comatose patients
- Various sizes (3,4,5)
— The appropriate size is measured from angle of the mouth to angle of
the jaw
2. Nasopharyngeal Airway
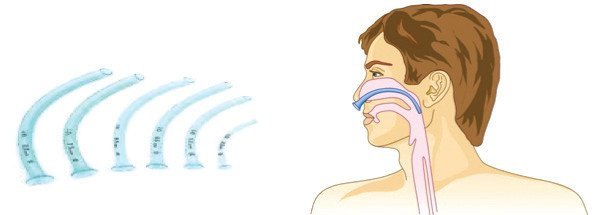
- An uncuffed tube made of soft rubber or plastic
- Used in patients where mouth opening is difficult
- More tolerable by semi-comatose patients
- Used with caution in patients with base of skull fracture or with ENT bleeding
- May cause airway bleeding.
- Various sizes (size indicates internal diameter)
— The appropriate size is measured from the tip of the nose to the tragus of the ear
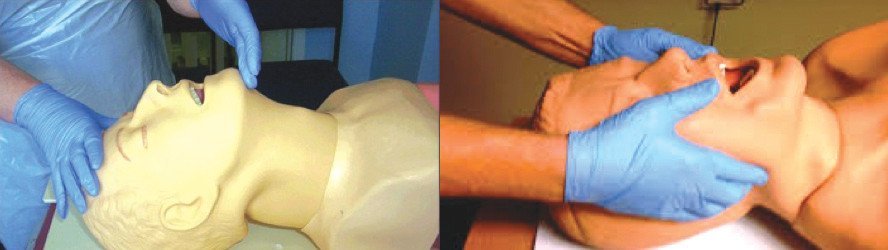
Manual Assist Ventilation
In unconscious or semi-conscious victims, the healthcare provider should open the airway by head tilt-chin lift or jaw thrust (if suspected cervical injury). An oropharyngeal or nasopharyngeal airway may be used to prevent the tongue from occluding the airway
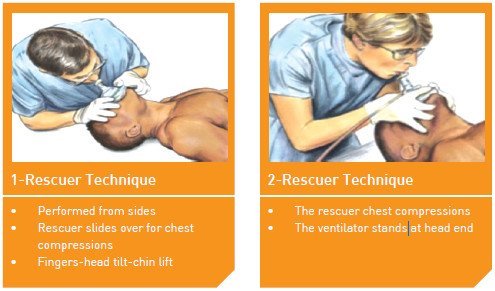
1. Mouth to Mask Ventilation (Pocket Resuscitation Mask)
Pocket resuscitation mask is a one-way valve mask
- Advantages:
— Eliminates direct contact
— Oxygenates well if O2 attached
— Easier to perform than bag-mask ventilation
— Best for small-handed rescuers - Two ways of carrying out mouth to mask ventilation depending on whether
there are 1 or 2 rescuers
2. Bag-mask Ventilation
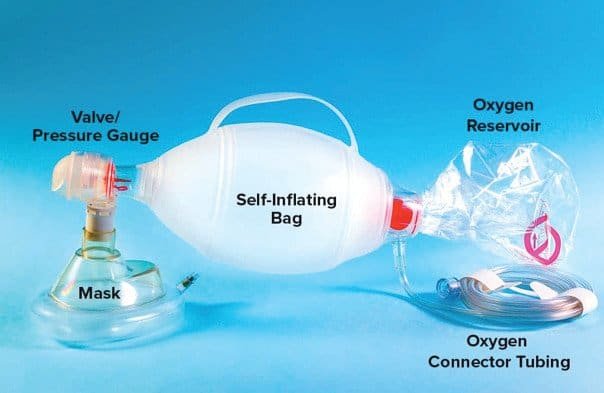
The bag-mask device consists of a self-inflating bag with a non-rebreathing valve
— Can be used with a face mask or an advanced airway e.g. Supraglottic airway devices (SGAs) or endotracheal tube (ETT)
— Provides positive pressure ventilation
— Cannot be used to allow spontaneous breathing
- Adequate ventilation can be ensured when there is a visible chest rise (5-6 ml/kg)
- Overventilation may result in gastric inflation with complications such as regurgitation and aspiration.
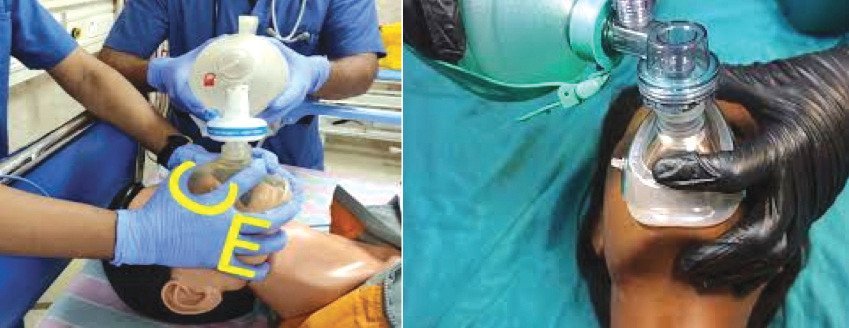
- The bag mask device is held with an EC clamps technique using either 1 hand or 2 hands.
Advanced Airway Devices
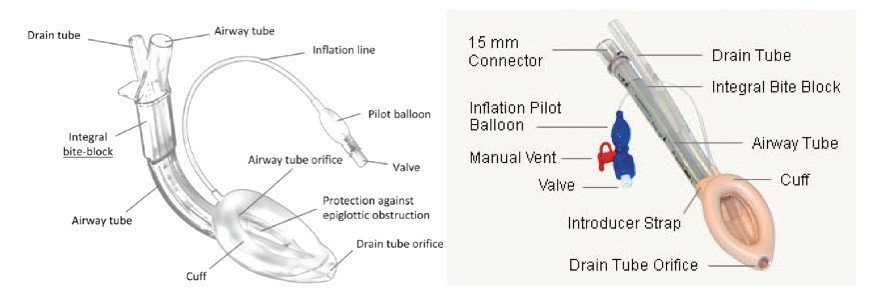
1. Supraglottic Airway Devices (SGAs)
SGAs are devices designed to maintain an open airway and facilitate ventilation. Insertion of a supraglottic airway device does not require visualization of vocal cords, therefore can be done with minimal chest compression interruptions.
2. Laryngeal Mask Airway
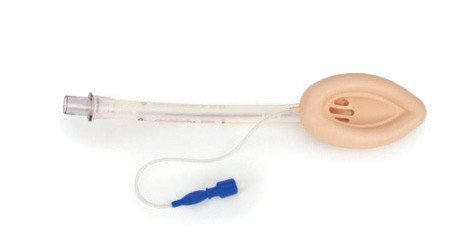
- An advanced airway device that is considered an acceptable alternative to the ETT
- Technically easier to insert with minimal interruption to chest compression
- Ventilating a patient via LMA does not protect against gastric aspiration
- Composed of a cylindrical tube with a cuff and connected to an inflatable pilot balloon
Recommended Size Guidelines for LMA in adults

Insertion of LMA
Before inserting an LMA, the following items must be prepared:
- Personal protective equipment – mask, eye shield/goggle, gloves
- Appropriate size LMA
- Syringe with appropriate volume (10, 20 or 50 ml) for LMA cuff inflation
- Water soluble lubricant
- Ventilation equipment
- Tape or other device(s) to secure LMA
- Stethoscope
The following are the steps necessary for successful insertion of LMA:
Step 1 : Size selections – as per Recommended Size Guidelines
Step 2 : Examination of LMA
Inspect surface of LMA for damage, including cuts, tears or scratches
— Do not use the LMA if the airway tube is damaged in any way
- Inspect interior of LMA airway tube to ensure that it is free from blockage or loose particles
— Any particles present in the airway tube should be removed as patient may inhale after insertion - Inflate cuff to ensure that it does not leak
- Deflate cuff to ensure that it maintains a vacuum
Step 3 : Check inflation and deflation of cuff
- Inflate cuff with the recommended volume of air
- Slowly deflate cuff to form a smooth flat wedge shape which will pass easily around the back of the tongue and behind the epiglottis
Step 4 : Lubrication of LMA cuff/mask
- Use a water-soluble lubricant to lubricate
- Only lubricate LMA cuff/mask just prior to insertion
- Lubricate back of LMA cuff/mask thoroughly
- Avoid excessive lubricants on interior surface or in the bowl of cuff/mask as inhalation of the lubricant following placement may result in coughing or obstruction
Step 5 : Position head for insertion
- LMA can be inserted even if the head is in the neutral position as long as the mouth opening is adequate
- Avoid LMA fold over:
— Assistant pull the lower jaw downwards
— Visualize the posterior oral cavity
— Ensure that LMA is not folding in the cavity as it is inserted


- Finally connect to bag-mask or ventilator and look for chest rise
- Confirm equal breath sounds over both lung fields, absence of ventilatory sounds over epigastrium and no air leaks from mouth
Complications Of SGAs
- Aspiration (in patient with full stomach)
- Laryngospasm
- Bronchospasm
- Airway trauma
- Inadequate ventilation due to gas leakage
3. Endotracheal Intubation
Endotracheal intubation is the gold standard for airway management during cardiac arrest. It keeps the airway patent, permits suctioning of airway secretions, enables delivery of a high concentration of oxygen, provides an alternative route for the administration of some drugs, facilitates delivery of a selected tidal volume and protects the airway against aspiration. Endotracheal intubation should only be performed by trained personnel.
Laryngoscope
- Consists of a handle (which contains a battery power source) and a blade
- 2 types of blades: Macintosh blade (curved) for adults, Miller blade (straight) for newborn and infants
- Before using the laryngoscope, ensure that the light on the blade is in good working order

Endotracheal Tube
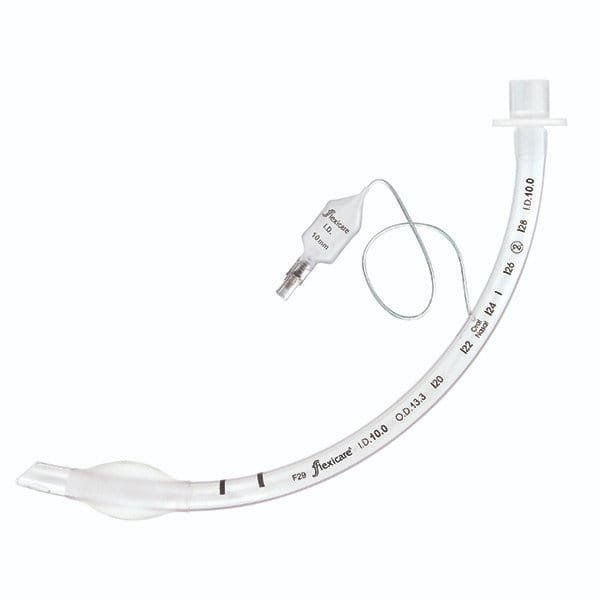

Preparation for Endotracheal Intubation
The equipment needed for intubation may be remembered as mnemonic MALES:
M – Mask (bag-mask), Magill forceps
A – Airways (Oropharyngeal/Nasopharyngeal Airway)
L – Laryngoscope, LMA, Lubricant gel
E – Endotracheal tubes + Stylet + tape for securing ETT
S – Suction (Catheter/Younker), Syringe, Stylet
- Adequate oxygen source
— wall or cylinder
— if oxygen source is from oxygen cylinder, check O2 pressure - Enough helping hands
- Equipment to confirm correct placement of ETT i.e. Stethoscope, CO2 detector devices
- Resuscitation and intubation drugs available and ready
The Technique of Endotracheal Intubation
The following steps are necessary for successful endotracheal intubation:
Step 1: Position patient in the “sniffing the morning air” position:
- Flexion at lower cervical spine
- Extension at atlanto-occipital joint

Step 2 : Preoxygenation
- 100% O2 for 3 minutes or with 4 vital capacity breaths (maximal
inspiration)
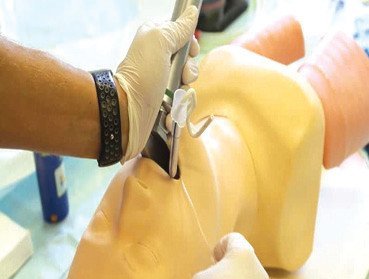
Step 3 : Laryngoscopy and insertion of ETT
3A : Laryngoscopy
- Hold the laryngoscope in the left hand
- Enter at the right side of the mouth and push the tongue towards the left
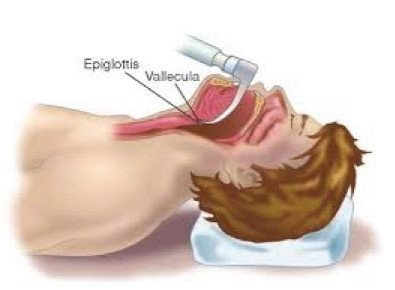
- Move the laryngoscope blade towards the midline and advance to the base of the tongue
- Advance the laryngoscope blade to the vallecula
- Lift upward and forward to bring up the larynx and vocal cords into view. Do not use teeth as a fulcrum or a lever
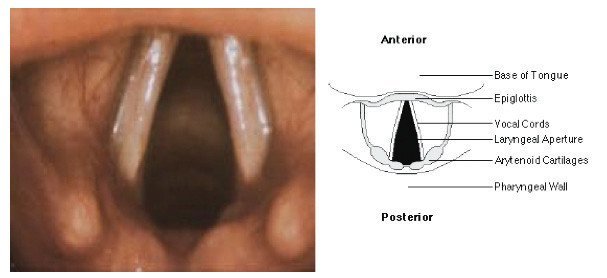
3B : Insertion of ETT
- Insert the ETT through the vocal cords. View the proximal end of the cuff at the level of the vocal cords and advance it about 1 to 2.5 cm further into the trachea
- Inflate the ETT with enough air to occlude the airway to achieve an adequate seal
- Ideally a cuff manometer should be used to obtain a cuff pressure of 20 – 30 cm H2O
Important point to note: Endotracheal intubation attempts should not interrupt chest compression for more than 5 seconds
Step 4A : Correct placement of ETT can be suggested by:
- Observing colour of patient
- Visualizing chest rise and presence of vapour in the ETT during ventilation
- 5 points auscultation for breath sounds (auscultate epigastrium, anterior chest at bilateral mid-clavicular lines and thorax at bilateral mid-axillary lines)
Step 4B : Confirmation of ETT placement is by:
- End-tidal CO2 with capnography
- CO2 detector device
Step 5 : Secure ETT with tape
Step 6 : Ventilate with a tidal volume of 6-8 ml/kg at a rate of 10 breaths per minute
Waveform Capnography

Continuous waveform capnography is recommended as the most reliable method of confirming and monitoring correct placement of the endotracheal tube (ETT).
End-tidal CO2 during resuscitation:
- Confirms ETT placement
- Correlates with cardiac output
- Assesses adequacy of ventilation
- Indicates quality of CPR
- Signifies ROSC
- Carries prognostic value for survival during resuscitation
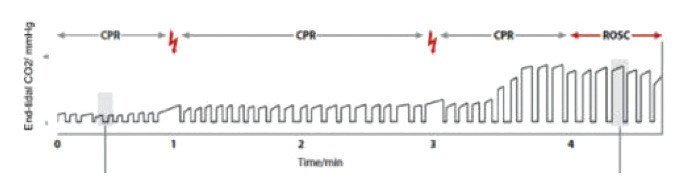
Waveform Capnography during resuscitation. Abrupt rise indicates return of spontaneous circulation.
- Use EtCO2 as a guide for monitoring the quality of chest compressions
Complications of Endotracheal Intubation

📝 References :
- Advanced Life Support Training Manual CPG, The Ministry of Health Malaysia 2022